Thursday, December 16, 2010

Spring Storm, Looking West

I live in the center of the state of Oregon, an area of the high desert that extends across much of the interior west. When people think of Oregon they usually picture rain, thick pine forests, and majestic mountains - all beautiful. But the eastern half of the state has a different personality equally beautiful, and I am always interested in painting the vastness of the grasslands, the volcanic sculpting of the landscape, and the elemental power of our ever changing weather.

My inspiration for Spring Storm, Looking West comes from just such a location - the grasslands and empty spaces of the north central area of our state. Small towns that are little more than wide spots in the road are slowly disappearing due to the lack of work and a loss of interest in the lifestyle. This is antelope country. Elk, mountain lion and coyote, pheasant, Canadian Geese, grouse...the wildlife reclaims the territory as quickly as the human population moves out.

What I love most about this area of our state is that I can stand out in the elements and see towering volcanic mountains covered with snow in one direction, and an endless horizon in the other direction. When I am standing in this environment I find myself wondering what it would have been like over a hundred years ago. I imagine myself riding through the canyons, leading a string of pack mules, looking for a sheltered place to stop for the night. There is a romance in the idea that we might once again be able to live closely aligned with the natural world.

This painting is 18 by 24 inches, and it is currently unframed. If you are interested in finding out more about Spring Storm, Looking West, please email me.


Thursday, November 18, 2010

"Good Things Small Packages" - Women Artists of the West Small Format Sale


Women Artists of the West
is featuring Good Things, Small Packages, an on-line, small format art sale, perfect for the holidays. You will find beautiful art from some of the top artists in the country, so I hope you will take a look.

I am offering three small format paintings for sale as part of this show.


Aspen Study #1, 10" x 8", oil on panel, not framed
$75.00 and includes shipping.


Aspen Study #2, 10" x 8", oil on panel, not framed.
$75.00, includes shipping


Cloud Study #1. 8" x 10", oil on panel, not framed
SOLD

If you are interested in purchasing any of these small paintings, please email me

There are many beautiful and affordable paintings offered for sale during this show, so if my work isn't quite what you want, please take a look at what the other artists have to offer. Most pieces are framed. My paintings will fit into standard frames, leaving you the option of framing that suits your tastes, while keeping the price within your comfort levels.

Please enjoy all the beautiful work and have a joyous holiday season!

Tuesday, November 16, 2010

Along the Deschutes


Click Here to Bid

Oil landscape on an 8" by 16" RayMar linen panel

This is another painting offered during my studio sale. I hope you'll take a look. It is not framed, but the size of 8 x 16 should not be too expensive for custom framing. Besides you get to pick the framing you want.

Sunday, November 7, 2010

Year End Studio Sale

SOLD

It's the last two months of the year and I would like to thank all my supporters and collectors by offering a year-end Studio Sale. I am offering smaller paintings for sale and using ebay to allow you to bid on your favorite piece. Because of the economy - and out of gratitude - I am starting each auction at an extremely low price so I hope you'll click over to ebay and see what's happening.

This painting is titled "Tempest". It is 14" by 14" on 1.5" stretchers, a wonderful linen that I prepared using rabbit skin glue and an oil ground. I've painted the edge thinking that it could be framed in a float frame with just a hint of the color vibrating between canvas and frame. It's not framed (one reason for the low starting bid) and could live quite happily on your wall just as it is until framing is desired.


Thank you again for all of your supportive comments and feedback. I appreciate the time you have invested here.

Tuesday, October 19, 2010

Studio Tip for October


In this economy I'm always thinking about ways to save, so recently I started saving my "grays".

At the end of a painting session, there's always paint on the palette. But my leftover paints were never of sufficient quantity to warrant mixing them into grays and filling empty tubes. I worried about ending up with lots of tubes that would be filled with small quantities of mystery colors.

But I also hated throwing away perfectly good paint, or worse, trying to use it in the next painting when the colors weren't appropriate.
My solution is this:
  • I mix together the remaining paint on the palette and add a few drops of clove oil. Clove oil retards the drying of paint, and smells great. You can also use linseed oil, walnut oil - whatever you prefer. Just don't put in too much oil.
  • I then scoop this blob of paint into a plastic food container with a snap on lid. I recently noticed that you can find very small containers in the grocery store. Or you can recycle what you have on hand. Just wash thoroughly first and keep the lids/lips clean.
Now when I begin a painting session I can easily add these grays to my palette. I can pick and choose warmer or cooler mixtures just by looking into the containers.

Friday, September 17, 2010

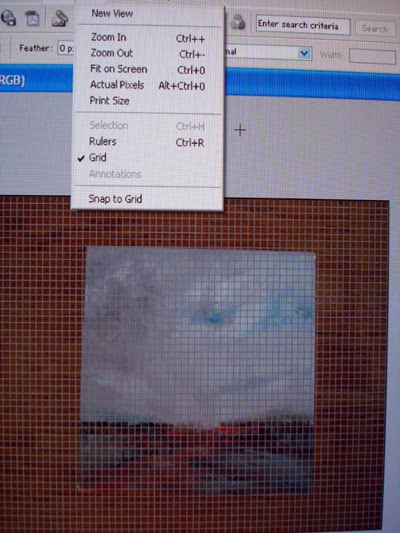
Easy Photoshop Tips for Your Best Artwork Photos

So you take the photo of your artwork and then discover...it's crooked! Here are the simple steps to go from a "Do Over" to "It's Perfect." (This also works if you deliberately shoot at an angle to reduce glare off the painting surface.)

I am using Photoshop Elements, the pared down version of the big version for graphic designers. Still has everything I need. And I've given up on the fancy lighting. I just put the painting on the floor and shoot. (FYI - you can get photoshop for the MAC - I use mine all the time because it will resize when IPhoto won't.)

Open your image. Then click the View drop down menu and select "grid"


The grid is confusing to me at this point so I reduce the size of my image (roll the controller thing on the mouse) or use Ctrl - (minus sign) until only the bold lines are visible. Now you can see how far out of square your image is.


Next open the Image drop down menu and select Transform - then skew. You will be asked "background layer" say yes, then "layer 0" say ok.

Using your mouse, put the pointer on one of the corner circles and drag the image, using your grid lines to help you keep things square. This works in all 4 directions if you need them.

Now go back to View and uncheck the grid.

Then select the crop tool (Rectangular Marquee tool) and crop your now square image.

Next, you want to adjust for the lack of perfect lighting. Select Enhance, then Adjust Brightness/Contrast...then Levels.


This is the "Bell Graph" that opens up. By moving the outside triangle sliders to the starting and ending points on the graph, you keep the light to dark ratio while adjusting the lighting/brightness/contrast stuff. The triangle slider in the middle can be adjusted either way, play with it to see what it does, but usually I just leave it alone.
You're almost done. Now, open the Layer tab (most important) and look at the bottom. If Flatten Image is in bold (it will be if you skew), then select it.

The last step is "Save As" (found in "File" top left corner of the main menu bar). Save as a tiff. This will be the image you will use for every other copy you make. A tiff does not lose data each time you open it. Then "Save As" again as a jpeg so you now have 2 copies of your image.

If you need a smaller copy, go to your tiff, duplicate the image and resize that one, then save it as a jpeg. Or resize the original jpeg.

ALWAYS -- as the VERY LAST STEP -- go to filters, then sharpen, then to unsharp mask. Your program will probably have a default selection for amount, radius and threshold. The amount should be around 100 for digital, you can increase this for print. The radius is how many pixels in the "blob" of pixels to be sharpened, and threshold has to do with the degree of difference between one section compared to the adjoining section. It's all rather confusing, but I have mine set at 100, radius 0.9 pixels, and threshold 9 levels. Sometimes I run that up a bit. Experiment to see what happens if you want to better understand it.

Try this and see if it doesn't make life easier.

Thursday, July 29, 2010

Lily Pads at Hosmer Lake


Lily Pads at Hosmer Lake
oil, 15 x 30
Sue Favinger Smith @2010

Hosmer Lake is one of the most beautiful fly fishing and kayaking lakes in Oregon. Surrounded by marshes and snow capped volcanic mountains, it is a very spiritual place, one of renewal and contentment. Surrounded by birdsong, buzzing and flitting dragonflies, the bitterns, osprey and bald eagle - it's as close to the natural world as you can get.