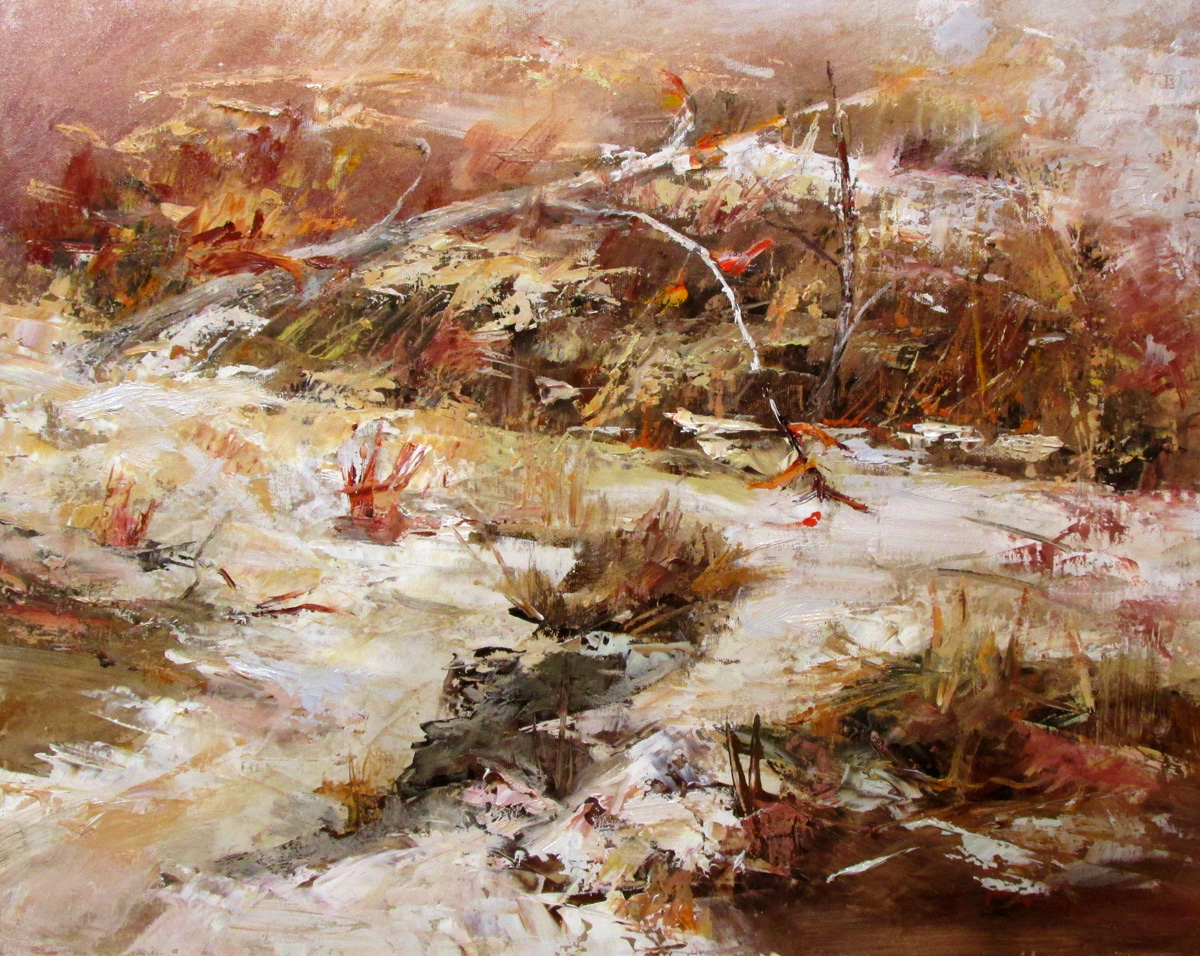
Monday, November 2, 2009

Studio Lights

new fixture replacing old florescent

My studio is in a spare bedroom in my house - a common situation for many painters - and the standard ceiling lighting is inadequate. A few years ago I replaced the ceiling fixture with a florescent fixture, which flooded the room with bright light but made it difficult to accurately judge color. I added a fixture above the west-facing window and used a floor lamp in one corner, but these fixes still did not give me the lighting I desired.

A month ago I decided to research studio lighting and discovered that many experts suggest a variety of lighting sources and types. I've included links to some of those sites at the end of this post. I understood the obstacles to lighting that I had: West and North facing windows, a ceiling fixture, a room about 11 x 11, and not wanting a major lighting project that would make it difficult to convert the space back into a bedroom if the need arose.

The research I did led me to conclude that I needed multiple light sources that I could control, a way to avoid glare and, conversely, shadows by diffusing the light. I needed task lighting that I could direct down on my work space, and I needed lighting that could work for me both in daylight and at night.

I ended up with a compromise in what I could do. First, I replaced the ceiling florescent fixture with one from the home improvement store that allows me to direct the light. This fixture uses 50 watt GU10 bulbs and the light does have a yellow cast.


Using this light alone I can create a wash of light on the wall and my easel.

But I needed a way to countermand the cast shadows created by this light source. I decided to use floor lamps that direct the light upward to wash across the ceiling. These lights are slightly more blue/white.
One lamp in one corner, another lamp in the opposite corner. The newer lamp uses a 3-way natural light bulb, I'm not sure what is in the other lamp. Above the window I have an adjustable fixture, plus a clamp on light with a GE 50 watt Reveal daylight bulb

I use another clamp on light with a 50 watt Reveal bulb to light my palette and control cast shadows. I also use an Ott Lite above the easel.

While not the ideal if I were planning my dream studio, I find this assortment of lighting sources to be far more flexible than the single wash of light from the florescent fixture. I can control the light and direct it where I want, or increase or decrease the illumination, and it was quite affordable. I would eventually like to purchase a floor stand and a solux light bulb, too.

The above photos were taken at night, with each source "on it's own" - but with all the lights the working environment is comfortable. During the day, when I do most of my work, the ambient light is brighter, more neutral, and yet with all the flexibility I desired.

Useful Links:

An Artists Network PDF on Studio Lighting

A Blog Post From Pastel Artist Daniel Wise

Utrecht Art Fixtures

Solux Fixtures

Wednesday, October 21, 2009

Perception and Imagination Opening November 6th, at High Desert Gallery - Bend, Oregon

Tuesday, September 29, 2009

More from the Copper Leaf Paintings


Ancestor Series
oil on copper leaf on panel
6x6
@2009

I was asked to share more information on my process with these copper leaf paintings. I may have talked about it before, but here is the information again.

I stumbled on this idea a few years ago. I was creating paintings on 3" deep canvases and was unhappy with the way the painted sides looked. I had some copper leaf I'd purchased but never used. So I applied it to the canvases, and now, 3 years later, the sides look as great as when I did them, so I'm confident as to what I'm doing.

Now I start with a gessoed panel. I brush on GAC (an acrylic product) in small areas and then lift and apply small pieces of the copper leaf, available commercially in craft stores. It comes in thin sheets and can be a little frustrating to apply. I either tear or cut small pieces between 1 and 2 inches and gently lay them on the GAC, brushing into place. You will end up with a less than smooth surface, but these wrinkles are what I want for my surface. When the entire panel is covered, I brush it again with a thin, even coat of the GAC and allow to dry.

Next, I use burnt umber acrylic paint and a thick paper towel. I put a bit of thinned paint right onto the paper towel, and using my finger, rub it across the surface. The acrylic paint also lets the oil paint bond to the surface of the copper leaf. When the acrylic layer is dry, the panel is ready to be painted.

I sketch in the "landmarks" for my faces with charcoal, and I use a limited palette of colors. I've also created still life paintings using this process. The copper works with you or against when it comes to values, but if you think of it as a mid-value range and push a lot darker and a lot lighter, it's fine. The small size of the panels I'm using right now means I can finish a painting in about 2 hours - if the faces come. They aren't always cooperative.

When I am happy with the oil painting, I allow that to dry and then coat the entire surface with galkyd. This prevents the copper from tarnishing, although there is no guarantee that some areas won't react to all the materials applied. I have panels I painted more than 3 years ago, where I embedded copper leaf in galkyd. Some copper turned dark, but most of it is as bright as it was when I used it.

Keep in mind that the surface is rough, so fine detail is hard to achieve. I use the beautiful warm color of the copper as a value.


SOLD

This is the painting I donated to the NAWA fundraiser. I went back in and added detail to her eyes with one of my smallest brushes, and I'm pleased with the result. I hope it sells.

Monday, September 7, 2009

New From the Ancestor Series


Sibyl #2
oil on copper leaf
7"x5"
@2009

It's the end of a busy summer. The weather is starting to cool down and I think everyone is starting to get back to business. I hope you had as much fun these past few months as I did.

The image above is a small painting I did for the National Association of Women Artists. They are hosting an art sale a fundraiser at a Tea Party, October 15 and 15. If the artwork doesn't sell at the event it will be included in an online sale. When I get the information I will pass along the link.

It's difficult for me to fully participate in all the great NAWA events since I live on the west coast and the events all happen in New York City. But at least I can send this small painting. Hopefully it will sell for a good cause.

humm...maybe I need to touch up that right eye...


Sunday, July 5, 2009

New Ancestors Series

The Ancestor Series, oil, graphite on panel @the artist, 2009


I've started a new series called The Ancestors. I'd like to say it was initially inspired by the Toltec idea of the naguals - "women and men of knowledge," but it wasn't until I started reading "The Four Agreements" by modern nagual Don Miguel Ruiz, that I made a connection as to where these "faces" might be coming from.


I originally thought of them them as "faces hidden in the grounds" - meaning that first I textured my surfaces and then began an exploration using graphite, sandpaper, and eventually oil paint as the faces emerged. Now I'd like to think of them as The Ancient Ones, keepers of knowledge on how best to follow a spiritual path.


These are painted on some beautiful 6" x 6" cradled panels that I purchased from Deborah Paris's company, Mountains Edge Frames . I'd ordered a variety of panels with a totally different project in mind, but sometimes the Muse has her own mind made up and I just go along for the ride.

As for the birch painting panels, I highly recommend them. Beautiful finish, light-weight, and the depth of the cradle seems just right for my purposes. I have used other commercial products and I think Mountains Edge is one of my favorites.

Tuesday, June 9, 2009

Green Onions


Green Onions
16 x 20, oil on linen on panel
@the artist


I haven't been painting the small daily paintings for weeks, now - first, because my work hours increased (which is good) leaving me precious little time to paint ( which is bad). And secondly, I realized that by concentrating only on the small format, I risked losing compositional skills necessary for larger works.

"Green Onions" is on one of the linen panels I documented in an earlier post titled "How To Make Your Own Painting Panels." I really enjoy working on the oil ground, although it takes getting used to - it's not as absorbent as the acrylic grounds. At first I had a hard time with the "brushy" aspect of the first layers of paint, but I've been studying an excellent book by Bob Rohm, titled "The Painterly Approach," and I'm starting to understand how to use the surface to my advantage.

This painting underwent several major changes as I went along, including scraping off several red onions from the foreground. It will probably never venture out of my studio, but I enjoyed the learning process and will most likely paint a version of this composition again.

Monday, May 4, 2009

Copper Leaf Paintings in Oil


"Sibyl"
oil on copper leaf, 7 x 5
@2009
sold

"Sibyl" - semilegendary women of the ancient world, who possessed prophetic powers.

Where has the time gone? Here it is May and I haven't posted to this blog in over three weeks!

"Sibyl" was a request from a client who had looked at one of my copper leaf ladies over at Etsy, and when she decided to buy, it had already been sold. After several nudges from her I painted another face, showed it to her while it was still wet, and she loved it.

I have a few more panels that are now covered with copper leaf, and I'm trying to fit time in to finish them.